Whirlpool washers start the wash cycle by filling with water.
Nothing happens when the water does not flow and the problem can be one of several things. First, a quick explanation of why we care about the water level switch when the washer is not filling and then I will detail the basic steps I use to troubleshoot any washer that will not fill.
The function of a water level switch on a Whirlpool washer.
The water level switch controls the power going to the water inlet valve. Electrical power is routed from the timer through the water level switch to the water inlet valve. When the correct water level is reached in the tub, the water level switch will remove power from the water inlet valve and direct it to the motor. This action ends the fill cycle and begins the agitation phase. Specific models may have more components in the circuit, but this is the basic operation.
Troubleshooting steps I use to identify the problem.
These steps apply to the most common washers. Upscale models may have additional components in the circuit (such as thermistors and water valves with more than two solenoids), but these basic steps can serve as a starting point.
Select different water temperatures.
A. If the water flows on one temperature selection and not another.
Disconnect the water hoses at the machine and test by running water through each hose into the drain.
Inspect the sediment screens in the inlet of the water valve and clean any sediment that is blocking the flow.
If suspected flow problem is corrected, reconnect hoses and go back to step 1, otherwise, go to step 3 “Test the Whirlpool washer inlet valve” (skip step 2).
B. If there no water flow on any selection go to step 2 below picture.
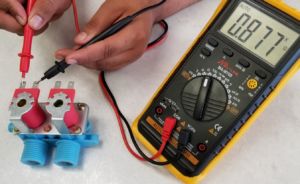
Remove and test the Whirlpool washer water level switch (picture above) also known as a pressure switch. Use a multi-meter to test for continuity (connection) between the terminals. Alternatively, the pressure switch can be taken to the nearest U-FIX-IT store for free testing.
A. Two of the three terminals should show continuity between them.
B. Blow gently on the hose connection of the pressure switch until you hear a click.
The two terminals that were showing continuity should now show open until the pressure is released.
The common terminal should now show continuity to the third terminal until the pressure is released.
Water level switch is bad if it fails to test as described in the previous two steps, otherwise, go to step 3.
Test the Whirlpool washer water inlet valve or remove the water valve and take it to the nearest U-FIX-IT store for free testing.
A. Set the water temperature to warm.
B. Using a multimeter check that there is 110 volts present at one of the solenoid coils on the water valve.
If 110 volts is present at the coil and no water is flowing through the valve then water valve is bad.
If 110 volts is not present at any solenoid then use the schematic wiring diagram to work back through the circuit until the lost voltage is found.
If these steps for identifying the common Whirlpool washer fill problems do not isolate the problem, locate the wiring diagram for your washer and call the nearest U-FIX-IT store for personalized help in locating the problem.
Maximize appliance efficiency with genuine Frigidaire parts from Ufixit Repairs. Enhance performance and extend lifespan for a seamless home experience today!
Get expert tips for major appliance repair services. Learn how to troubleshoot common issues and maintain your appliances efficiently for a worry-free home.
Join the Discussion: Whirlpool Washer Not Filling with Water
valve, whirlpool washer water valve, whirlpool washing machine water valve, whirlpool washer fill valve, whirlpool cabrio water valve, whirlpool cabrio washer fill valve, whirlpool cabrio washer water valve, whirlpool washer fill valve replacement, whirlpool washer inlet water valve, water, water pressure
Frequently Asked Questions
How can I test my water inlet valve?
To test a water inlet valve, unplug the appliance and shut off the water supply. Disconnect the valve and use a multimeter to check for continuity across the terminals. You can also reconnect water briefly to observe if it opens and allows proper flow during a fill cycle.
What signs indicate a faulty valve?
Signs of a faulty valve include no water entering the appliance, slow filling, leaking, or continuous water flow even when the appliance is off. You may also hear humming without water entering, indicating a malfunction.
How to clean the water inlet valve?
To clean the valve, turn off water supply and remove the inlet hoses. Check and clean the small filter screens inside the valve to remove debris or sediment. Rinse gently with water and reinstall once clean.
Can I replace the valve myself?
Yes, replacing a water inlet valve is usually a DIY-friendly repair. It involves disconnecting power and water, removing the faulty valve, installing the new one, and reconnecting hoses and wiring. Always follow safety precautions.
How to identify valve leaks?
Valve leaks can be identified by checking for water pooling around the appliance, visible drips near the valve connections, or moisture along hoses. Inspect seals and fittings for cracks or looseness.
How to access the water inlet valve?
The water inlet valve is typically located at the back of the appliance where the water supply hoses connect. You can access it by removing the rear panel or top cover, depending on the appliance design.
What are the steps for valve replacement?
To replace the valve, unplug the appliance and shut off water supply. Remove access panels, disconnect hoses and wiring, unscrew the old valve, and install the new one in the same position. Reconnect everything securely and test for proper operation.
Can a clogged filter affect the valve?
Yes, a clogged filter screen in the valve can restrict water flow, leading to slow filling or no water entering the appliance. Regular cleaning helps maintain proper performance.
How to ensure proper valve installation?
Ensure proper installation by securing the valve firmly, reconnecting hoses tightly without over-tightening, and matching wiring connections correctly. After installation, turn on water and check for leaks before running a test cycle.
How to check for electrical issues with the valve?
Use a multimeter to test the valve solenoid for continuity. If there is no continuity or resistance is outside the normal range, the valve may be defective. Also check wiring connections for damage or looseness.
How does water pressure affect the valve?
Proper water pressure is necessary for the valve to function correctly. Low pressure can prevent the valve from opening fully, while high pressure may cause leaks or damage over time. Maintaining recommended pressure ensures optimal performance.
What should I do if the valve is stuck?
If the valve is stuck, try cleaning it to remove debris. If it remains stuck or does not open or close properly, replacement is usually the best solution to restore proper operation.
How to find a replacement valve model?
To find a replacement valve, locate your appliance’s model number and search for compatible parts using that number. Check part listings, diagrams, or manufacturer recommendations to ensure the correct match.
whirlpool washer lf code, whirlpool washer not filling with water, water inlet valve whirlpool washer, whirlpool washing machine not filling with water top load, whirlpool cabrio washer not filling with water
Common Issues Preventing Water Fill
Several common issues can prevent a Whirlpool washer from filling with water. These include a malfunctioning water inlet valve, a defective water level switch, or clogged hoses. Each of these problems can disrupt the water flow necessary for the washer to operate effectively.
For instance, if the water inlet valve is stuck closed due to mineral buildup or debris, the washer will not fill. Similarly, a faulty water level switch may fail to signal the inlet valve to open, leading to the same issue. Regular maintenance and inspection of these components can help prevent these problems.
Steps to Test the Water Inlet Valve
Testing the water inlet valve is a crucial step in troubleshooting a Whirlpool washer that won't fill with water. To perform this test, you will need a multimeter to check for electrical continuity. Disconnect the washer from the power source and remove the valve to inspect it.
Once you have access to the valve, use the multimeter to measure resistance across the terminals. A reading of zero indicates the valve is operational, while an infinite reading suggests a defect. If the valve is faulty, it will need to be replaced to restore proper function to the washer.
Understanding the Role of the Water Level Switch
The water level switch plays a vital role in regulating the water fill in your Whirlpool washer. It detects the water level in the tub and sends signals to the inlet valve to either open or close based on the desired level. If this switch malfunctions, it can lead to overfilling or underfilling, impacting the wash cycle's effectiveness.
To ensure the water level switch is functioning correctly, check for any blockages in the pressure hose connected to it. Additionally, you can perform a continuity test to confirm its operational status. Replacing a faulty water level switch can resolve filling issues and enhance washing performance.
When to Seek Professional Help
While many troubleshooting steps can be performed by the user, there are instances when seeking professional help is advisable. If you've exhausted basic troubleshooting steps and the washer still won't fill, it may indicate a more complex issue requiring expert diagnosis.
Professional technicians have the tools and expertise to identify and resolve intricate problems that may not be apparent to the average user. Additionally, if your washer is still under warranty, contacting a professional may be necessary to avoid voiding the warranty through DIY repairs.